Wooden Laminate
STEP 1
Put the unopened packs into
the room to acclimatise for 48 hours. The flooring is thin enough to fit
under most doors, but to check place a board on the underlay next to the
door. If it won’t open, remove from its hinges and plane the bottom
edge.
 The
new floor also needs to fit under the architrave. If necessary, saw the
bottom of the architrave so that a board plus underlay can slide
underneath. Skirting boards do not need to be removed
to fit flooring as the gaps around the edge of the room can be hidden by
a matching self-adhesive cover strip or beading. However, if you wish to
remove skirting boards to replace them over the gaps later, this should
be done now.
The
new floor also needs to fit under the architrave. If necessary, saw the
bottom of the architrave so that a board plus underlay can slide
underneath. Skirting boards do not need to be removed
to fit flooring as the gaps around the edge of the room can be hidden by
a matching self-adhesive cover strip or beading. However, if you wish to
remove skirting boards to replace them over the gaps later, this should
be done now.
STEP 2
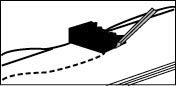
Look to see which direction
the light falls into the room. If possible, lay the boards so that the
sunlight falls along their length.Polythene underlay must be used under
the foam underlay on concrete floors or wherever there is any chance of
moisture passing from the sub floor to the boards. Overlap sheets by at
least 20cm (8") and take the edges up the wall by 2.5cm (1").
Any excess can be cut off later.
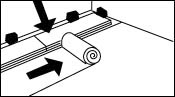
 Foam
underlay helps to reduce the sound of footsteps and levels slight
unevenness. Roll the foam in the same direction and the new boards will
be laid, a length at a time, making sure that the polythene flap is
overlapped by the foam at the joints. Measure the width of the room and
work out how many rows of boards the floor will contain. If the last row
is less than 8cm (3") wide, begin by cutting the first row of
boards so that they are approximately the same width as the last row.
Foam
underlay helps to reduce the sound of footsteps and levels slight
unevenness. Roll the foam in the same direction and the new boards will
be laid, a length at a time, making sure that the polythene flap is
overlapped by the foam at the joints. Measure the width of the room and
work out how many rows of boards the floor will contain. If the last row
is less than 8cm (3") wide, begin by cutting the first row of
boards so that they are approximately the same width as the last row.
Lay the first row of boards,
from left to right, without gluing, with the groove facing the wall,
leaving an expansion gap of 9mm around all edges (a pair of spacers). As
all walls are slightly uneven and the boards must be kept straight,
adjust the spacers to accommodate small differences in width. If your
walls are very uneven you will need to cut the boards to follow the
wall. Mark where to cut the boards by holding a pencil against a spacer
and sliding it along the wall.
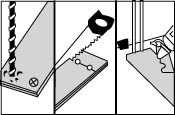
 To
avoid damaging the surface, if using a handsaw the top of the board
should face upwards when cutting, if using a jigsaw the bottom of the
board should face upwards. Insert spacers every 40cm (16") between
the wall and boards and at both ends of each row. To cut the board at
the end of the row place it so that its tongue is touching the last
board laid, mark the cutting line and saw.
To
avoid damaging the surface, if using a handsaw the top of the board
should face upwards when cutting, if using a jigsaw the bottom of the
board should face upwards. Insert spacers every 40cm (16") between
the wall and boards and at both ends of each row. To cut the board at
the end of the row place it so that its tongue is touching the last
board laid, mark the cutting line and saw.
Start the second row with
the piece of board left from the first row. If it is shorter than 20cm
(8") cut a new board. Lay the second and third rows without gluing
and adjust as necessary so that the rows are straight. If all the joints
meet properly then the floor has been laid straight. Boards should
always be laid so that there is at least 20cm (8") between joints
to maintain the strength of the floor.
STEP 3
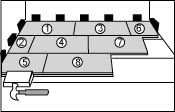
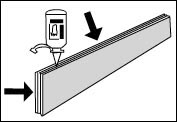
When gluing, the first three
rows are laid at the same time, as it is easier to keep the rows
straight and quicker to lay your floor. The boards are laid in an
overlapping pattern in the order shown in the diagram below. For boards
in the first row, apply glue to the upper edge of the end groove only.
Place the hitting block over the tongue and hammer to push the panels
together. Never hit the tongue or groove directly. Immediately remove
glue from the face of the boards with a cloth.
 For
boards in the second and third rows glue the upper edge of the grooves
along both sides and ends of the boards. Carefully tap the end then side
joints together using the hitting block. Use the crowbar to tighten the
last board in each row and finish with spacers. Lay the rest of the
floor a row at a time.
For
boards in the second and third rows glue the upper edge of the grooves
along both sides and ends of the boards. Carefully tap the end then side
joints together using the hitting block. Use the crowbar to tighten the
last board in each row and finish with spacers. Lay the rest of the
floor a row at a time.
The last row: The last row
of boards will normally need to be cut down their length. Mark the
cutting line by placing a board directly on top of the last row laid,
groove facing you, with an off cut on top, tongue against the wall.
STEP 4
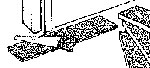
To fit around pipes: mark
the position of the pipe on the board, allowing for the expansion gap.
Measure the width of the pipe and drill or chisel a hole in the board
(use a drill bit 18mm (3¼4") larger than the pipe to allow for the
expansion gap). Cut a section from the board, lay the board around the
pipe and glue back the sawn piece.
 Finishing:
Remove all traces of dust from the floor. To cover the gap either peel
the backing from the cover strips and attach, replace the skirting
boards, ensuring that the floor can move freely underneath, or use a
timber beading or moulding of your choice, fixing it to the skirting to
allow the floor to move freely.
Finishing:
Remove all traces of dust from the floor. To cover the gap either peel
the backing from the cover strips and attach, replace the skirting
boards, ensuring that the floor can move freely underneath, or use a
timber beading or moulding of your choice, fixing it to the skirting to
allow the floor to move freely.
Where the floor meets carpet
or linoleum use a threshold to bridge the height difference.
 STEP
5
STEP
5
Maintaining your floor:
Flooring is a durable smooth surface and so needs a minimum of
maintenance. To keep your floor looking its best:
DO
